
Flask Vue.js全栈开发|第18章:Elasticsearch全文搜索

Synopsis: 博客文章数量一旦比较多的时候,用关键字进行全文检索就很有必要了,目前开源的全文搜索引擎有 Elasticsearch、Apache Solr、Whoosh 等,本文选择 Elasticsearch 7.0 来实现博客文章内容的全文搜索,并对搜索关键词进行高亮
本系列的最新代码将持续更新到: http://www.madmalls.com/blog/post/latest-code/
1. 安装 Elasticsearch 7
参考: https://www.elastic.co/guide/en/elasticsearch/reference/current/rpm.html
1.1 安装 JAVA 8
Elasticsearch 是使用 Java 编写的,它的内部使用 Lucene 做索引与搜索,但是它的目的是使 全文检索 变得简单,通过隐藏 Lucene 的复杂性,取而代之的提供一套简单一致的 RESTful API。所以,Elasticsearch 需要 java8 或更高版本,先检查 CentOS 7 的 JAVA 版本:
如果还没有安装,或版本过低,请先安装 JAVA:
1.2 安装 Elasticsearch RPM
# 1. Download and install the public signing key
[root@CentOS ~]# rpm --import https://artifacts.elastic.co/GPG-KEY-elasticsearch

# 2. Create yum repository
[root@CentOS ~]# vim /etc/yum.repos.d/elasticsearch.repo
内容如下:

[elasticsearch-7.x]
name=Elasticsearch repository for 7.x packages
baseurl=https://artifacts.elastic.co/packages/7.x/yum
gpgcheck=1
gpgkey=https://artifacts.elastic.co/GPG-KEY-elasticsearch
enabled=1
autorefresh=1
type=rpm-md

# 3. Install Elasticsearch
[root@CentOS ~]# yum -y install elasticsearch
[root@CentOS ~]# systemctl start elasticsearch.service
[root@CentOS ~]# systemctl enable elasticsearch.service
Elasticsearch 安装好后,默认的安装目录为 /usr/share/elasticsearch,默认的配置文件目录为 /etc/elasticsearch,默认的启动端口为 9200
测试 Elasticsearch 是否启动成功:
[root@CentOS ~]# curl 'http://localhost:9200/?pretty'
{
  "name" : "CentOS",
  "cluster_name" : "elasticsearch",
  "cluster_uuid" : "VCi-CCWYRjaInhykJS4asg",
  "version" : {
    "number" : "7.0.0",
    "build_flavor" : "default",
    "build_type" : "rpm",
    "build_hash" : "b7e28a7",
    "build_date" : "2019-04-05T22:55:32.697037Z",
    "build_snapshot" : false,
    "lucene_version" : "8.0.0",
    "minimum_wire_compatibility_version" : "6.7.0",
    "minimum_index_compatibility_version" : "6.0.0-beta1"
  },
  "tagline" : "You Know, for Search"
}
你也可以继续在 /etc/elasticsearch/elasticsearch.yml 配置文件中修改 cluster.name、node.name、path.data、network.host、http.port 等参数,比如你想让其它主机访问此服务器(IP:192.168.40.121)上的 Elasticsearch 服务的话,需要修改 network.host 和 discovery.seed_hosts:
ES 6 跟 ES 7 修改的参数不一样,出问题了记得查看 Elasticsearch 的日志 /var/log/elasticsearch/elasticsearch.log
Elasticsearch API 基本使用请参考: http://www.madmalls.com/blog/post/elasticsearch-basic/
2. 安装中文分词 ik
由于博文基本上是中文字符,使用 Elasticsearch 默认的词法分析器效果不好,所以需要安装 elasticsearch-analysis-ik
首先确认你的 Elasticsearch 版本号是多少,我们刚安装的是 Elasticsearch-7.0.0,所以到 https://github.com/medcl/elasticsearch-analysis-ik/releases 这个页面下载对应的 ik 版本(elasticsearch-analysis-ik-7.0.0.zip)
[root@CentOS ~]# /usr/share/elasticsearch/bin/elasticsearch-plugin install https://github.com/medcl/elasticsearch-analysis-ik/releases/download/v7.0.0/elasticsearch-analysis-ik-7.0.0.zip

[root@CentOS ~]# ls /usr/share/elasticsearch/plugins
analysis-ik
[root@CentOS ~]# /usr/share/elasticsearch/bin/elasticsearch-plugin list
analysis-ik
需要重启
Elasticsearch服务!
3. Python Elasticsearch Client
3.1 安装客户端
通过 pip 安装 Python 版本的 Elasticsearch 客户端 elasticsearch 包:
3.2 测试
打开 ipython,如果你没安装请执行 pip install ipython
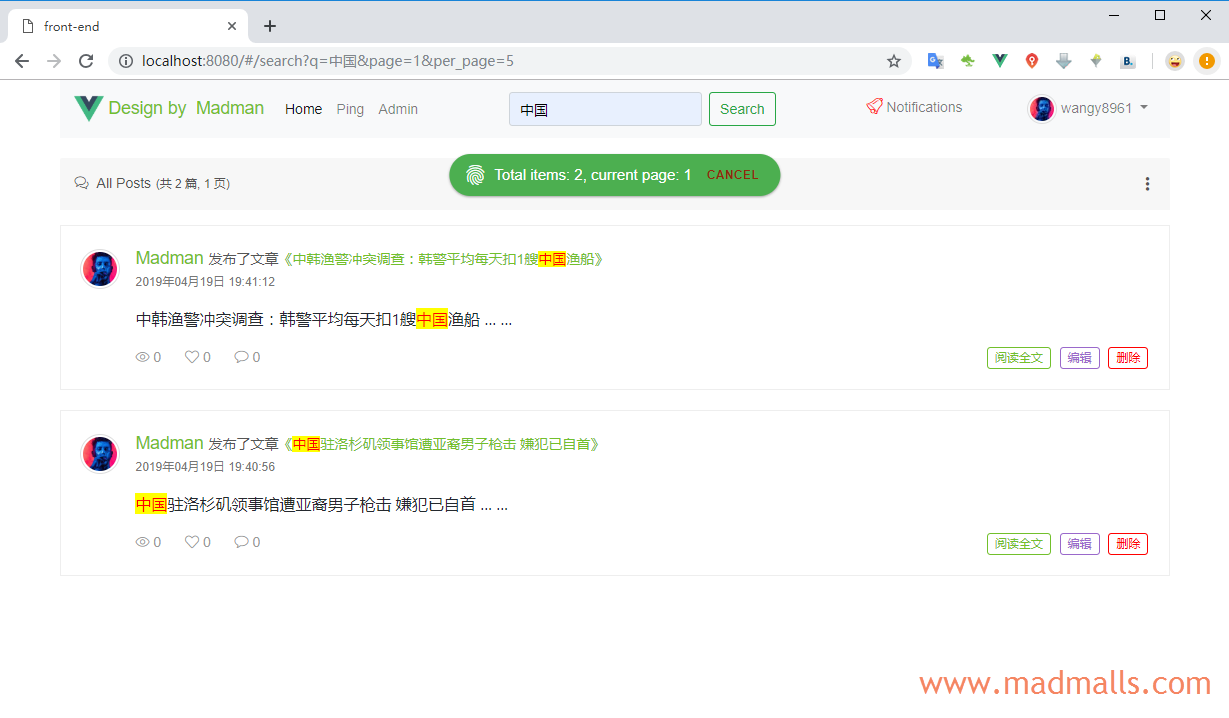
In [1]: from elasticsearch import Elasticsearch

In [2]: es = Elasticsearch('http://192.168.40.121:9200')

In [3]: es.indices.create(index='posts', ignore=400)  # 1. 创建名为 posts 的Index
Out[3]: {'acknowledged': True, 'shards_acknowledged': True, 'index': 'posts'}

In [4]: mapping = {
   ...:     'properties': {
   ...:         'content': {
   ...:             'type': 'text',
   ...:             'analyzer': 'ik_max_word',
   ...:             'search_analyzer': 'ik_max_word'
   ...:         }
   ...:     }
   ...: }

In [5]: es.indices.put_mapping(index='posts', body=mapping)  # 2. 设置Mapping,每个文档有个 content 字段,它的类型是 text,词法分析器是 ik
Out[5]: {'acknowledged': True}

In [6]: es.index(index='posts', id=1, body={'content': '美国留给伊拉克的是个烂摊子吗'})  # 3. 插入文档,每个文档必须使用唯一的 id
Out[6]:
{'_index': 'posts',
 '_type': '_doc',
 '_id': '1',
 '_version': 1,
 'result': 'created',
 '_shards': {'total': 2, 'successful': 1, 'failed': 0},
 '_seq_no': 0,
 '_primary_term': 1}

In [7]: es.index(index='posts', id=2, body={'content': '公安部:各地校车将享最高路权'})
Out[7]:
{'_index': 'posts',
 '_type': '_doc',
 '_id': '2',
 '_version': 1,
 'result': 'created',
 '_shards': {'total': 2, 'successful': 1, 'failed': 0},
 '_seq_no': 1,
 '_primary_term': 1}

In [8]: es.index(index='posts', id=3, body={'content': '中韩渔警冲突调查:韩警平均每天扣1艘中国渔船'})
Out[8]:
{'_index': 'posts',
 '_type': '_doc',
 '_id': '3',
 '_version': 1,
 'result': 'created',
 '_shards': {'total': 2, 'successful': 1, 'failed': 0},
 '_seq_no': 2,
 '_primary_term': 1}

In [9]: es.index(index='posts', id=4, body={'content': '中国驻洛杉矶领事馆遭亚裔男子枪击 嫌犯已自首'})
Out[9]:
{'_index': 'posts',
 '_type': '_doc',
 '_id': '4',
 '_version': 1,
 'result': 'created',
 '_shards': {'total': 2, 'successful': 1, 'failed': 0},
 '_seq_no': 3,
 '_primary_term': 1}

In [10]: es.search(index='posts', body={'query': {'match': {'content': '中国'}}})  # 4. 搜索 '中国'
Out[10]:
{'took': 188,
 'timed_out': False,
 '_shards': {'total': 1, 'successful': 1, 'skipped': 0, 'failed': 0},
 'hits': {'total': {'value': 2, 'relation': 'eq'},
  'max_score': 0.6548752,
  'hits': [{'_index': 'posts',
    '_type': '_doc',
    '_id': '3',
    '_score': 0.6548752


分享
相关推荐

作者
发表评论
专题系列


6 条评论
评论者的用户名
评论时间shishijia
2020-05-25T09:38:00Z博主你好,我没怎么接触过代码部署,这方面不太懂。我看Elasticsearch 7、中文分词ik都是在centos下安装的,那之后的通过 pip 安装 Python 版本的 Elasticsearch客户端elasticsearch 包、ipython,还有全文搜索代码的添加也是在centos下操作吗,还是在本地的windows下操作修改好后再上传到centos上?如果可以在本地windows操作,是不是也不能运行,只有部署到centos才能运行?
Madman shishijia Author
2020-05-25T09:59:38Zelasticsearch服务端和ik中文分词插件安装在CentOS服务器上,它会监听9200端口提供存储和查询数据的服务,就像MySQL数据库会监听3306端口一样。而你的Python代码中通过elasticsearch或pymysql这种Python版本的客户端来连接这些服务即可(IP加端口),所以Python代码可以跟这些服务运行在同一台计算机上,也可以分开运行
shishijia
2020-05-25T13:26:39Z谢谢博主。不好意思,我还想问如果我不想在本地windows下安装elasticsearch,只在centos下安装elasticsearch。我还能在windows的环境下运行这一功能吗?这属于远程开发吗?
shishijia
2020-05-26T09:24:37Z博主,我在curl 'http://localhost:9200/?pretty'时一直报错curl: (7) Failed connect to localhost:9200; 拒绝连接。 我感觉是端口问题,可我已经在/etc/sysconfig/iptables里添加了 -A INPUT -m state --state NEW -m tcp -p tcp --dport 9200 -j ACCEPT,在本地windows浏览器测试192.168.221.128:9200/?pretty,显示192.168.221.129 拒绝了我们的连接请求。 请问
M4nkeys
2020-07-26T03:08:35Z您好,麻烦问一下搜出结果后,点击某一个结果,然后跳转到相应的位置是怎么实现的?
Madman M4nkeys Author
2020-07-26T03:38:01Zfront-end/src/SearchResult.vue中第117行生成博文详情页的链接: